


Attaching BizTalk XML Messages as attachments to emails (with a file extension)
I’m in the middle of a BizTalk implementation, and for a certain set of messages, the only thing I want to do is notify someone that the message has arrived.
During my BizTalk lab training I saw InfoPath used as an convenient way of displaying XML files to users, so I did the nessecary to display the XML via InfoPath. (post on this coming soon).
In my orchestration I added a new Send shape where I wanted the email notification to be sent, and deployed the orchestration.
In the BizTalk Administration Console, I added a new Send Port of type SMTP. I’d already created a new pipeline for this message in order to add the stuff needed for InfoPath, so I selected this. [note: if you aren’t adding InfoPath stuff, create a Pipeline anyway, as you’ll need it later]. I configured the SMTP transport type according to my environment.
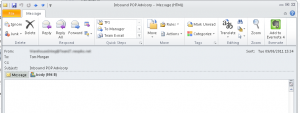
I though I’d done everything I needed to do so I was a bit put out when I got this:
 It’s not wrong – it’s just not what I was expected. I know the message is in XML, but BizTalk is treating it as a stream of data – and has literally output the stream into a file. If you were to save the attachment, and change the file extension to .XML it would look fine.
So, how to get BizTalk to add the file extension onto the outgoing message, so that you can safely include it in emails?
The answer is to create your own custom Pipeline component which adds on the extension as the byte stream passes through the pineline. Wait! Don’t give up! This is absolutely NOT as hard as it sounds! It just takes a bit of time.
- Create new class project for pipeline component
- Build & Deploy component
- Add component to Pipeline
- Get Attachments
1. Create new class project for pipeline component
- Create a new C# Class Library, calling it what you want. Add a reference to Microsoft.BizTalk.Pipeline (on my machine it’s at C:/Program Files (x86)/Microsoft BizTalk Server 2010/Microsoft.BizTalk.Pipeline.dll)
- Sign the assembly with a strong name
- Add using statements to: System.XML, System.IO, Microsoft.BizTalk.MessageInterop, Microsoft.BizTalk.Component.Interop
- Add the following decorations:
- [ComponentCategory(CategoryTypes.CATID_PipelineComponent)]
- [ComponentCategory(CategoryTypes.CATID_Encoder)]
- [System.Runtime.InteropServices.Guid(“9d0e4103-4cce-4536-83fa-4a5040674ad6”)]
- Implement IBaseComponent, IComponentUI, IComponent & IPersistPropertyBag
I’ve called my class XMLFileExtensionComponent. After all that, you should have something which looks like this:
using System;
using System.Xml;
using System.IO;
using Microsoft.BizTalk.Message.Interop;
using Microsoft.BizTalk.Component.Interop;

namespace XMLFileExtensionPipelineComponentCS{
[ComponentCategory(CategoryTypes.CATID_PipelineComponent)]
[ComponentCategory(CategoryTypes.CATID_Encoder)]
[System.Runtime.InteropServices.Guid("9d0e4103-4cce-4536-83fa-4a5040674ad6")]

public class XMLFileExtensionComponent : IBaseComponent, IComponentUI, IComponent, IPersistPropertyBag
When you create a pipeline you have to implement certain functions. We’re not concerned with almost all of them here, which the possible exception of Description, Name, Version and Item, which you can modify to suit your needs. Everything else is just stuff you need (read: stuff I don’t understand, stolen with thanks from Brajendra Singh.) You can either see his blog entry to understand what I’ve done, or copy the functions below:
public string Description
{
get
{
return "Pipeline component used to change set extension of message to XML for use in email attachments";
}
}
public string Name
{
get
{
return "XMLFileExtensionComponent";
}
}
public string Version
{
get
{
return "1.0.0.0";
}
}

public IntPtr Icon
{
get
{
return new System.IntPtr();
}
}

public System.Collections.IEnumerator Validate(object projectSystem)
{
return null;
}

private string _NewNameSpace;
public string NewNameSpace
{
get { return _NewNameSpace; }
set { _NewNameSpace = value; }
}

public void GetClassID(out Guid classID)
{
classID = new Guid("655B591F-8994-4e52-8ECD-2D7E8E78B25C");
}

public void InitNew()
{

}

public void Load(IPropertyBag propertyBag, int errorLog)
{
object val = null;
try
{
propertyBag.Read("NewNameSpace", out val, 0);
}
catch (ArgumentException)
{

}
catch (Exception ex)
{
throw new ApplicationException("Error reading propertybag: " + ex.Message);
}
if (val != null)
_NewNameSpace = (string)val;
else
_NewNameSpace = "http://AnonymusURL";
}

public void Save(IPropertyBag propertyBag, bool clearDirty, bool saveAllProperties)
{
object val = (object)_NewNameSpace;
propertyBag.Write("NewNameSpace", ref val);
}
The final (and most interesting) function, is the Execute one. This is where we actually do the work of setting the filename and file extension. I’ve chosen a fixed filename, but I guess you could make one up from one of the other properties in the message, or even a value in the message itself:
public IBaseMessage Execute(IPipelineContext pc, IBaseMessage inmsg)
{
inmsg.BodyPart.PartProperties.Write("FileName", "http://schemas.microsoft.com/BizTalk/2003/mime-properties", "message.xml");
return inmsg;
}
2. Build & Deploy component
Double check that you’ve signed your assembly, then build it. Assuming you get no errors, copy the output DLL from the Bin folder to the BizTalk Pipeline Components folder: this is located on my machine at C:/Program Files (x86)/Microsoft BizTalk Server 2010/Pipeline Components.
3. Add Component to Pipeline
Restart the Visual Studio project containing your BizTalk project, then open the Send Pipeline where you want the extension to be added. Right-click on the Toolbox and select Choose Items… This can take a while to load, and (for me) generated a couple of error messages before showing. Select the BizTalk Pipeline Components tab. Your new assembly should be listed at the bottom, so tick it to include it, and click OK.
Your component should now be visible in the Toolbox, and you can drag it onto the Pipeline. Add it to the Encode stage, and also include a MIME/SMIME encoder. You don’t have to set any properties for your new component, but for the MIME/SMIME encoder you should change Send body part as attachment to true.
Build & Deploy your orchestration.
4. Get Attachments
Assuming you still have your Send Port which sends emails, you shouldn’t need to change anything in order to make everything work. Any new message should show up as proper XML files attached to the message:

This isn’t quite as easy as it probably should be – and arguably should either be something that’s easily done out of the box, but if you don’t mind taking the time to create a new DLL – it’s not really that hard.
I’d like to thank the following webpages for their assistance in getting me here:
http://blogs.msdn.com/b/brajens/archive/2006/11/25/how-to-develop-biztalk-custom-pipeline-components-part1.aspx
http://msdn.microsoft.com/en-us/library/ms964541.aspx
http://social.msdn.microsoft.com/Forums/en-US/biztalkgeneral/thread/7c154502-2220-46e8-904a-753f7650e3da
http://geekswithblogs.net/edmundzhao/archive/2007/04/02/110618.aspx
Written by Tom Morgan
 Tom is a Microsoft Teams Platform developer and Microsoft MVP who has been blogging for over a decade. Find out more.

Hello thanks for you step by step, works fine. One question though, I don’t want the message
‘This message has an attachements’ is there any way of getting rid of that?